i2MassChroQ User Manual
- Preface
- 1 Generalities
- 2 Fundamentals in Bottom-up Proteomics
- 3 The main program window
- 4 Exploring identification data
- 5 Exploring post-translational modification data
- 6 Advanced Proteomics Configurations
- 7 i2MassChroQ and Quantitative Proteomics
- 8 Specific procedures for the timsTOF line of instruments
- A GNU General Public License version 3
3 The main program window
Proteomics data explorations, with i2MassChroQ, entail, for a large part, the following steps:
Configuration of the X!Tandem external software that runs the database searches (producing peptide vs mass spectrum matches—PSMs—, leading to the peptide identifications and ultimately to protein identifications);
Configuration of the protein database files (both the organism-specific protein databases and optional contaminant-containing databases);
Loading of the mass spectrometry data acquisition files (the mzML format is recommended);
Running X!Tandem from inside of i2MassChroQ;
Loading of the identification results produced during the previous step;

Note
i2MassChroQ can also handle peptide vs spectrum matches data (peptide identification data) from other software with the following formats:
mzIdentML;
pepXML;
Mascot DAT files
Relentless scrutiny of the peptide identification results. Optional modification of the results;
Protein inference, that is, protein identification on the basis of the peptide identifications. i2MassChroQ implements a protein grouping algorithm, as described in Figure 2.8, “Protein inference: constructing a consolidated protein identifications list”, that leads to consolidated protein identifications. The program has an interface geared towards the tweaking of the protein grouping process so as to let the user in full control of the stringency with which the protein identifications list is ultimately generated.
In this chapter, i2MassChroQ's main window's user interface is described in detail, in particular in the way it is a starting point for the main tasks briefly mentioned above.
3.1 Starting a new i2MassChroQ working session #
To start a session, run i2MassChroQ and the main program windows shows up as described in Figure 3.1, “Main program window”.
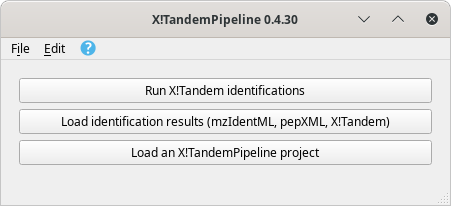
The main program window contains three buttons described in detail in the text.
Figure 3.1: Main program window #
The main program window contains three buttons that start the following main tasks:
Run X!Tandem identifications. See Section 3.2, “Running X!Tandem identifications”.
Load identification results (mzIdentML, pepXML, Mascot, X!Tandem). See Section 3.4, “Loading the Protein Identification Results”.
Load an i2MassChroQ project. See Section 3.5, “Loading i2MassChroQ projects”.
3.2 Running X!Tandem identifications #
To run X!Tandem-based identifications, click onto the Run X!Tandem identifications button. This triggers the opening of the window pictured in Figure 3.2, “X!Tandem-based identification configuration”.
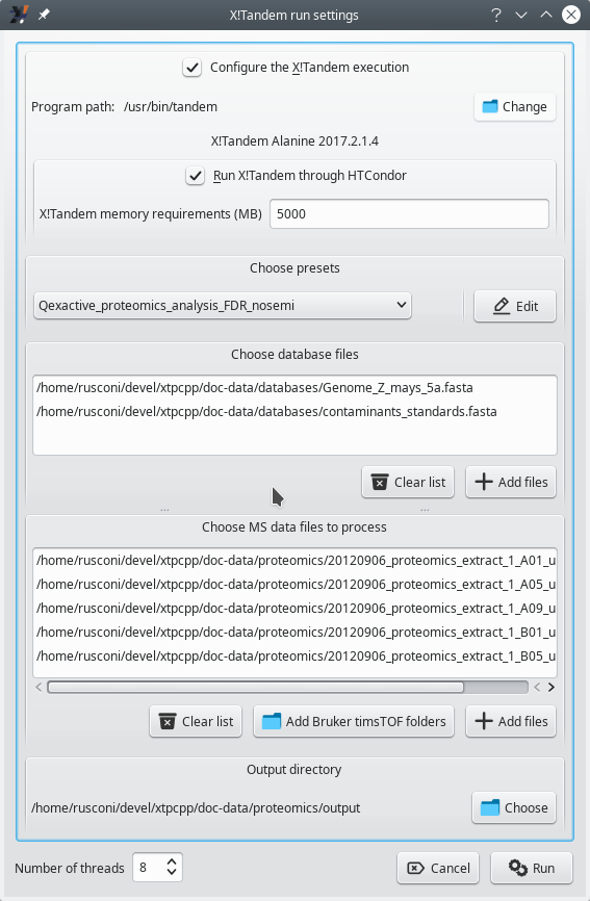
The configuration of a X!Tandem run is performed in this configuration window (see text for details).
Figure 3.2: X!Tandem-based identification configuration #
The configuration of an X!Tandem run entails defining the following:
Configure the X!Tandem execution: This setting allows one to specify the path to the X!Tandem software program. The version of the program, if found, is displayed below (in this case, Alanine 2017.2.1.4). This feature is useful when the user wants to test multiple versions of the X!Tandem software.
Run X!Tandem through HTCondor: Only check the box if running X!Tandem over the network on a server supporting HTCondor[7].
Choose presets: This setting defines the parameters that X!Tandem must use. Either load already known presets from the drop-down list widget or edit them (or create a new set) by clicking onto the Edit button. Note that to load an existing presets file, it might be necessary to point i2MassChroQ to the directory that contains the presets file. Use the folder icon for this, as visible in Figure 3.3, “X!Tandem presets configuration window (Spectrum tab)”.
Choose database files: Add protein database files in the FASTA format. There must be at least one protein database that contains all the known proteins for the organism of interest (there might be as many such database files as necessary) and optionally protein databases containing known contaminant proteins (there might be as many such database files as necessary). Click onto the Clear list button to clear the database files list and start anew if an error occurred (it is not possible to remove files one at a time).
Choose MS data files to process: Add the mass spectrometry data files (mzML or mzXML format) to be processed by the X!Tandem software. As many files as necessary might be added in the list.

Tip
When using Bruker timsTOF data, click onto the Add Bruker timsTOF folders button to select folders containing this kind of data. Bruker timsTOF data come as two files that must sit in the same directory.
Output directory: This setting specifies the directory into which new files output by the X!Tandem process need to be created. X!Tandem produces identification results in files in an XML format that i2MassChroQ reads during a later step.
Number of threads: This setting defines the maximum number of execution threads that X!Tandem might be using during its run.
Tip
Although i2MassChroQ sets that number of execution threads to 1, it is beneficial to set that number to the highest value possible.
3.3 Setting the X!Tandem Run Presets #
The Edit button of the Choose presets group box described above triggers the opening of a dialog window where the user might configure in the most detailed way the X!Tandem parameters. That dialog window is pictured in Figure 3.3, “X!Tandem presets configuration window (Spectrum tab)”. Only the Spectrum tab is shown, but the interface is similar for all the other ones.
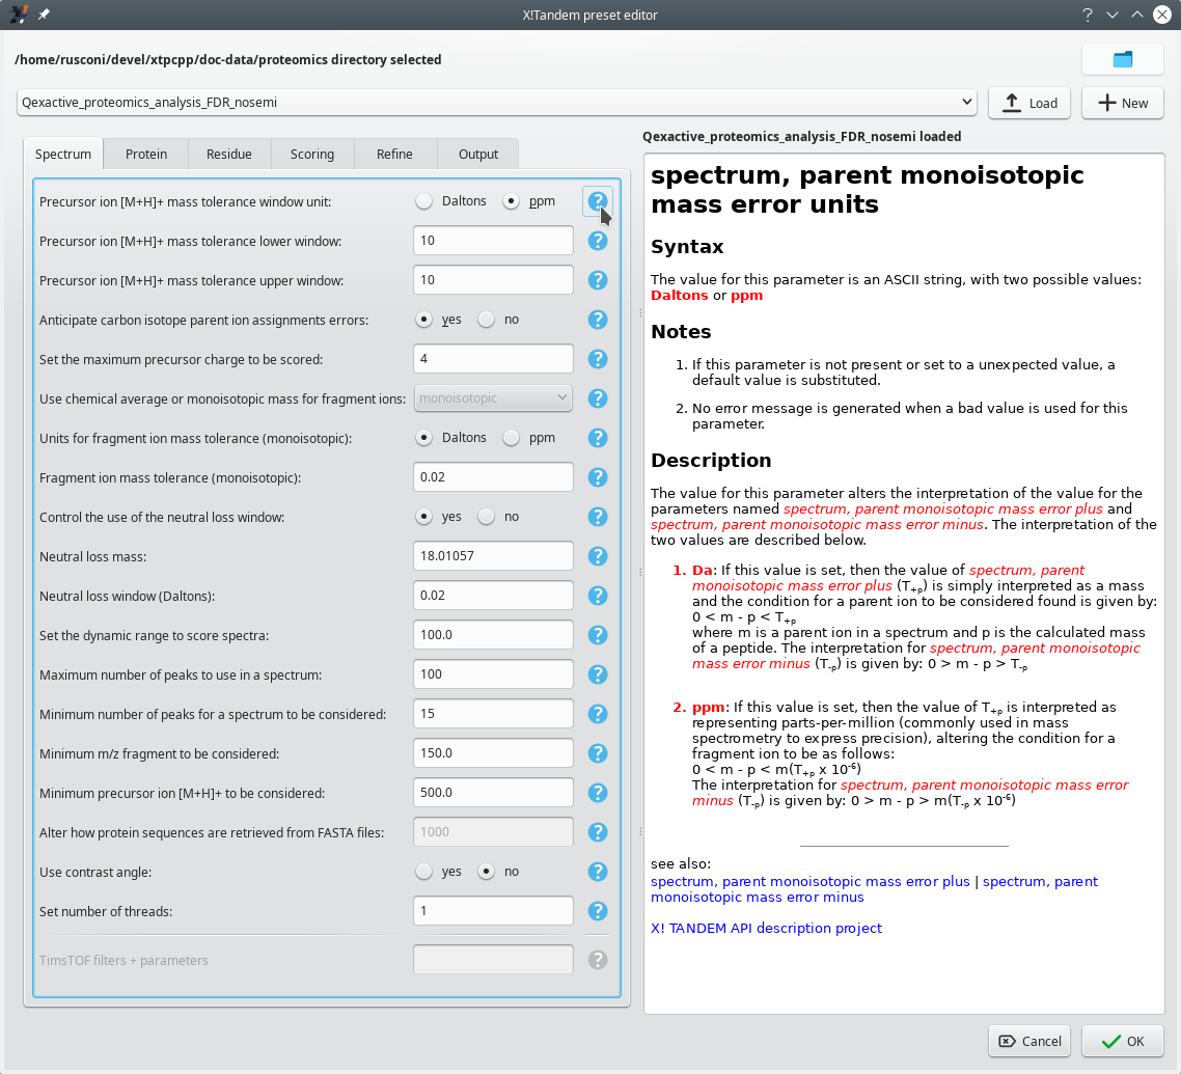
The configuration of the X!Tandem presets is performed in this configuration window. This window has its Spectrum tab selected. Each parameter is associated to a manual page[8] that can be displayed by clicking on the interrogation mark button next to it. It is possible to load existing presets from file or to create brand new ones.
Figure 3.3: X!Tandem presets configuration window (Spectrum tab) #
3.3.1 Loading existing presets configurations from file #
It is possible to load existing X!Tandem presets (which is useful in particular if the samples most often come from the same instrument using the same configuration). To this end, first point i2MassChroQ to the right directory that contains the presets file of interest (click onto the folder icon at the top right corner of the window shown in Figure 3.3, “X!Tandem presets configuration window (Spectrum tab)”). The presets files in the chosen directory are automatically detected and listed in the drop-down list widget. At this point, select from that list the file of interest and click onto the Load button.
Warning
It is compulsory to click onto the Load button to confirm loading of the presets file contents, because these are not updated upon choosing the file name from the drop-down list only.
3.3.2 Creating new presets configurations #
It is possible to create a new presets file by clicking onto the New button. This opens an input dialog window for the user to provide a new file name (the edit widget is preset with the currently loaded file's name suffixed with _copy).
Tip
One interesting feature of the new presets file creation process is that, if presets are already loaded, i2MassChroQ copies the currently displayed settings to the new file. From there, it is possible to create a variant X!Tandem presets file, which eases the exploration of the right X!Tandem parameters for a given sample data set.
3.3.3 Actual X!Tandem presets configuration #
The dialog window pictured in Figure 3.3, “X!Tandem presets configuration window (Spectrum tab)” contains a number of tabs where various aspects of the X!Tandem run settings are handled. Each parameter's documentation can be seen on the pane on the right hand side of the window by clicking onto the question mark button next to it. These manual pages are authoritative because they are taken from the X!Tandem software package with no transformation whatsoever.
Once the configuration has been performed, click onto the OK button. If the parameters were modified, i2MassChroQ asks if they should be stored in the file.
3.3.4 Running a properly configured X!Tandem process #
Once the X!Tandem settings configuration dialog window has been closed, it is possible to run X!Tandem from inside i2MassChroQ by clicking onto the Run button at the bottom of the window pictured in Figure 3.2, “X!Tandem-based identification configuration”.
While the computation is carried over, the program shows the feedback dialog window pictured in Figure 3.4, “X!Tandem run feedback to the user”.
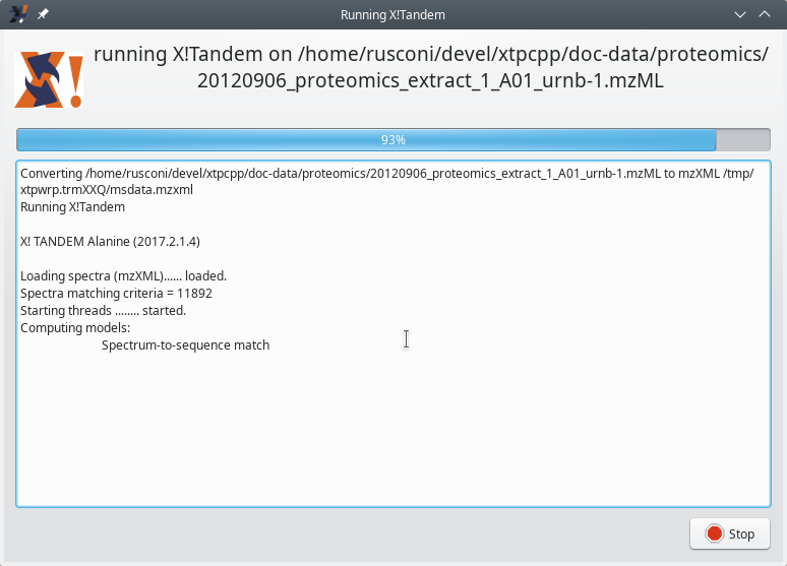
The text in this feedback dialog window is getting incrementally printed all along the computation.
Figure 3.4: X!Tandem run feedback to the user #
Once the computation is finished, the feedback dialog window closes and the user is returned to the main program window (Figure 3.1, “Main program window”) albeit with a message shown in Figure 3.5, “X!Tandem run finished message to the user”.
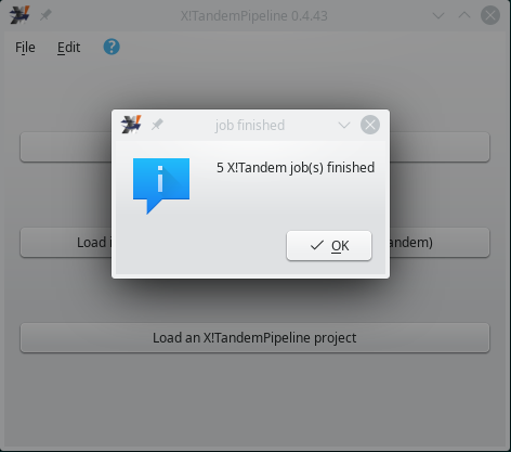
The X!Tandem run is now finished. Click the OK button to access the main program window.
Figure 3.5: X!Tandem run finished message to the user #
From the main program window, it is possible to open the X!Tandem results file(s) located in the output directory configured above. There are as many output files (XML-based format, and xml extension) as there were mass spectrometry data files to process. The loading of the results files is carried over by first clicking the button labelled Load identification results (mzIdentML, pepXML, X!Tandem). The process is described in Section 3.4, “Loading the Protein Identification Results”.
3.4 Loading the Protein Identification Results #
The loading of identification results comes with a minimal set of configuration required to instruct i2MassChroQ on the way to handle contaminant proteins, for example. This process is pictured in Figure 3.6, “Configuration of the loading of the identification results” and is described in the following section.
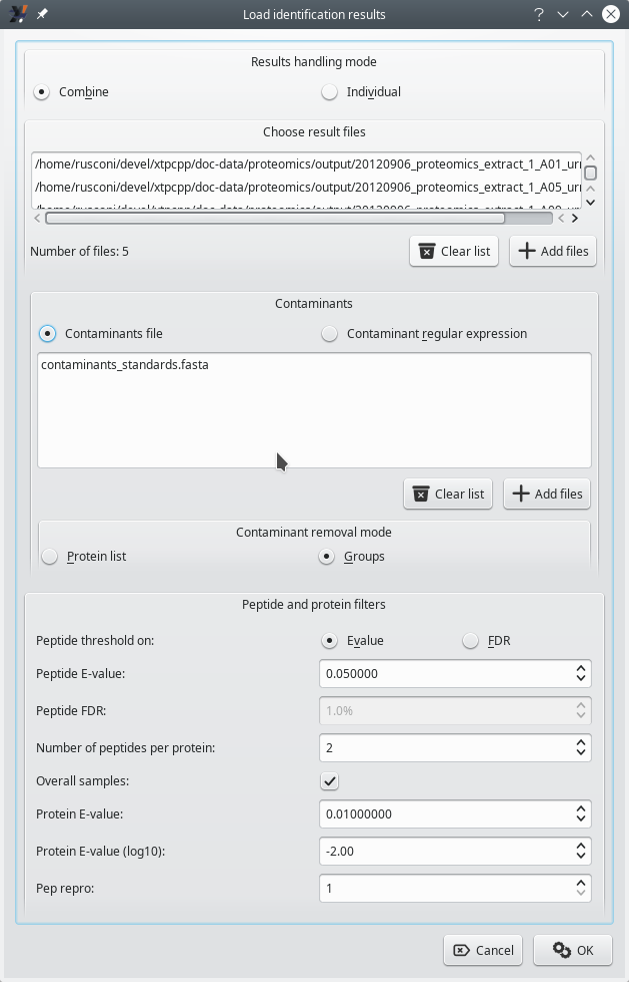
Loading identification results comes with some configuration that is described in the text.
Figure 3.6: Configuration of the loading of the identification results #
3.4.1 Identification Data Loading Configuration #
Results handling mode: there are two possibilities:
Combine: in this mode, all the identification results coming from different identification results files are merged into a single set. That single set is the basis for the protein inference step and the identified proteins are listed into a single protein list window.
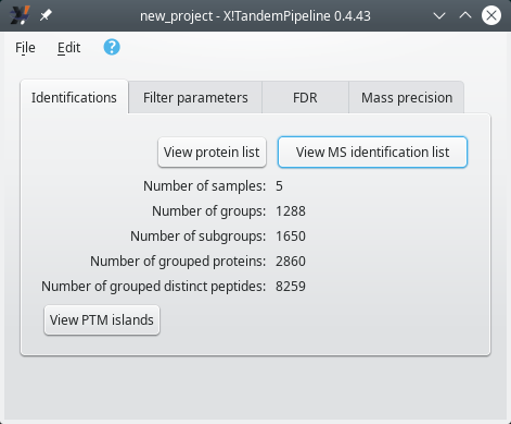
When loading multiple identification results files in Individual mode, the selection of any given identification results file is performed by selecting its name from the drop-down list widget and by clicking onto the View protein list button. Note that some metadata about the identifications are updated beneath the drop-down list widget.
Figure 3.7: Selecting a particular identification results file's data set #
Individual: in this mode, the identification results coming for various files are kept separated. Thus, the identification results coming from each file are used for a separate protein inference step. The identified proteins list is thus displayed for each single file in turn. The selection of the file for which the protein list needs to be displayed is done via the main program window that changes its appearance:
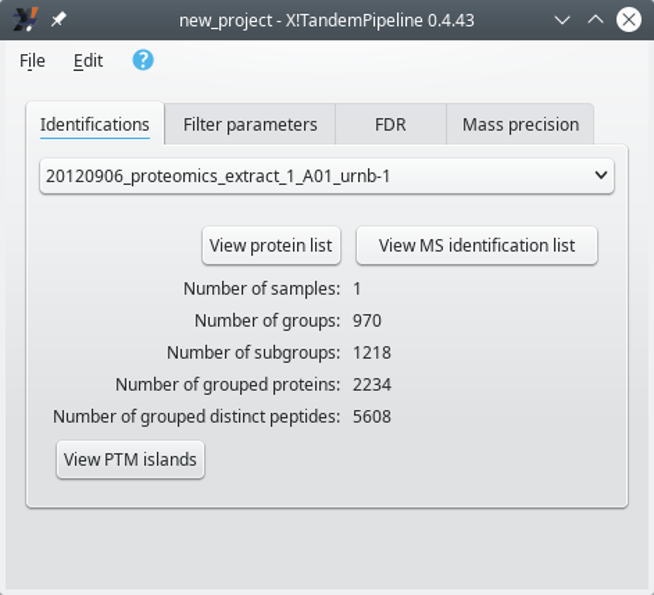
When loading multiple identification results files in Individual mode, the selection of any given identification results file is performed by selecting its name from the drop-down list widget and by clicking onto the View protein list button. Note that some metadata about the identifications are updated beneath the drop-down list widget.
Figure 3.8: Selecting a particular identification results file's data set #
Right after having selected an identification results file, click onto the View protein list to display the protein identifications list. That list has been obtained by performing the protein inference on the file's protein identification results (see Section 2.2.5.4, “Protein Inference: from PSMs to Protein Identities”). The window that opens up will be described later (see Section 4.1, “The Protein List Window”).
Tip
It is possible to open multiple protein list windows, each showing the identifications from a different file: maintain the Ctrl keyboard key pressed while clicking onto the View protein list button.
Choose results files: by clicking onto the Add files button, the user is provided a file selection dialog window from which any number of protein identification results files might be selected for loading.
Note that it is possible to list all the opened protein identification results files by clicking onto the View MS identification list button. The window that opens up will be described later (see Section 3.4.2, “Displaying the MS Identifications List”).
Contaminants: there are two possibilities here.
Contaminants files: when this radio button widget is selected, the list of contaminant proteins will be loaded from the files selected by clicking onto the Add files button.
Contaminant regular expression: when this radio button widget is selected, a text edit widget is shown, replacing the widget listing the contaminants database files. In this text edit widget, the user may enter a regular expression to match the accession number field of the protein databases that were used for the protein identification step. In this situation, the user must use specially crafted protein databases in which the contaminant proteins were tagged on the accession number using a particular text pattern. That particular text pattern is then matched against the Contaminant regular expression that the user enters in the text edit widget.
Contaminant removal mode: there are two possibilities. The contaminant removal is the process by which, when identified proteins match proteins in the contaminants realm (either from the contaminants dabase files or as determined using the regular expression), they are disregarded for the later protein visualization steps.
Protein list: in this mode, as soon as a protein identification loaded from a protein identification results file matches a contaminant protein, it is disregarded.
Groups: in this mode, the protein inference process goes all the way through to the determination of the protein groups (see Figure 2.8, “Protein inference: constructing a consolidated protein identifications list”). When protein groups have sub-groups that contain a contamimant protein, then the whole group is disregarded. This might appear drastic, but our experience is that most often, the sub-groups in a group do identify proteins belonging to the same family. Therefore, if one protein is contaminant, all the other proteins in the group are supposed to be such also.
Peptide and protein filters: this group box widget holds some parameters that configure the way protein inference is to be performed.
Peptide threshold on: there are two possibilities:
E-value: all the PSMs having an expectation value higher than that value are disregarded. Enter the value in the spin box widget labelled Peptide E-value. A typical value for the X!Tandem engine is 0.05. When more stringent results are desirable, setting 0.02 should yield satisfactory results. See Section 2.2.5.2, “Computation of the Peptide Expectation Value (E-value)” of a detailed explanation of the E-value computation.
FDR (false rate discovery): the PSMs are disregarded if their FDR value does not match this parameter. Enter the value in the spin box widget labelled Peptide FDR. A typical setting is 1%.
Tip
Using FDR is most useful when the identification results come from a database searching engine that does not compute an E-value. However, it does only work if the searching step was performed also on a decoy database. In X!Tandem the decoy database is crafted by reversing the peptide sequences. In this case, when proteins are identified on the basis of the reversed peptide PSM, then the protein identity is tagged with the “reversed” string, which might be used with the Contaminant regular expression setting defined earlier.
Number of peptides per protein: this is the minimal required number of peptides that must be identified as belonging to a given protein in order to consider that protein identity as a valid one. These peptides have to be from non-contaminant proteins, of course.
Overall samples: when checked and if multiple identification results files are to be loaded, then the Number of peptides per protein requirement might be fulfilled by looking for peptides in all the loaded files. For example, if one results file provides one peptide for a protein identification and another file provide another peptide (different from the first one) to identify the same protein, and if the Number of peptides per protein is 2, then the protein is considered as a valid protein. If not checked, that number of peptides requirement must be fulfilled by looking into each results file separately. This last setting is more stringent. A typical value for this setting is 2.
Tip
This setting needs to be checked in at least one case: when a complex peptidic mixture is separated by ion chromatography (typically on an SCX—strong cation exchange—resin) and the different fractions are analyzed by bottom-up proteomics. The peptides coming from a given protein might be located in different fractions, and thus in different protein identification results files!
Protein Evalue: threshold above which a protein identification is disregarded (see Section 2.2.5.3, “Computation of the Protein Expectation Value (E-value)”).
Protein Evalue (log10): convenience spin box widget for the user to easily set the protein E-value.
Pep repro: if set to 1, a peptide, to be accounted for, needs to be found in one protein identification results file. If set to a greater number, then that peptide needs to be found in that number of results files. This setting sets more stringent protein identification conditions each time it is incremented.
3.4.2 Displaying the MS Identifications List #
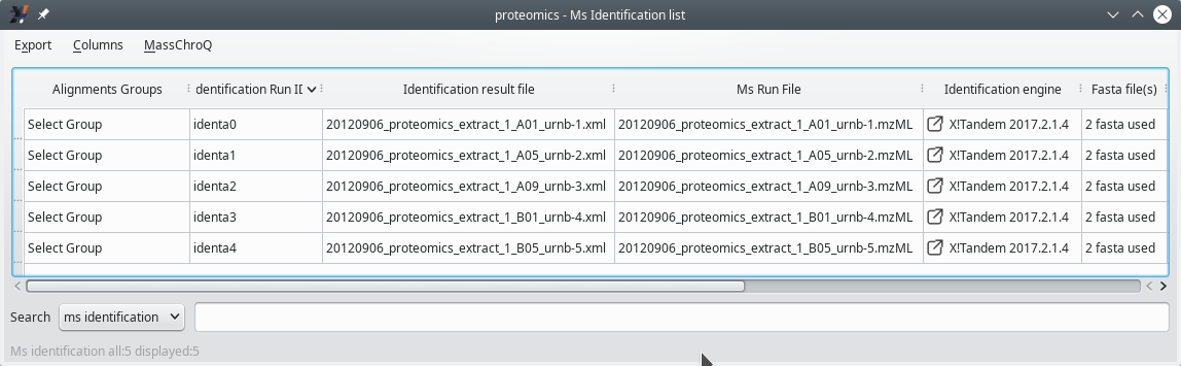
This window displays a list of all the files that were involved in the X!Tandem run (first columns).
Figure 3.9: Displaying the MS identifications list (first columns) #
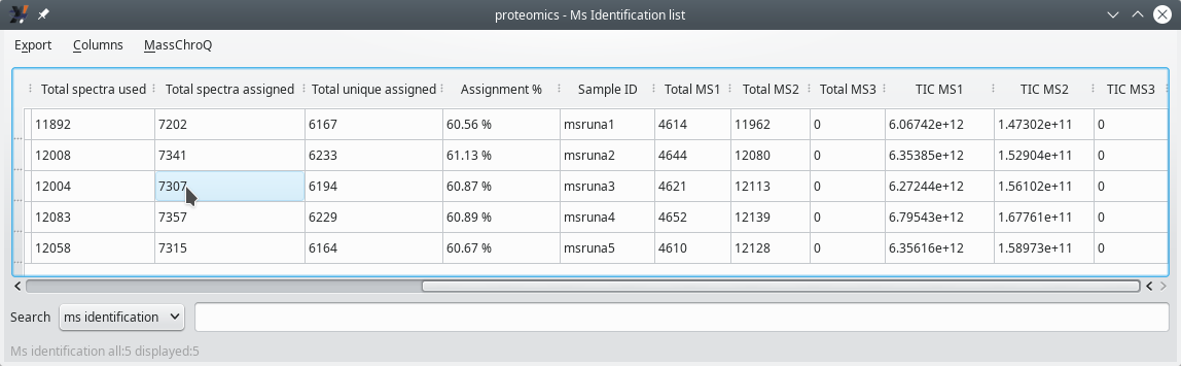
This window displays a list of all the files that were involved in the X!Tandem run (last columns).
Figure 3.10: Displaying the MS identifications list (last columns) #
3.4.3 Saving i2MassChroQ projects #
Once exploration and optional modication of the identification data have
been performed, the user can save the resulting data set into a i2MassChroQ
project by selecting the menu item
of the menu in the main program window (the
extension of the file name typically should be xpip). See Section 3.5, “Loading i2MassChroQ projects” for loading such a
project.
3.5 Loading i2MassChroQ projects #
Loading of i2MassChroQ project files (file of xpip) extension) is only possible if the user
has previously
Loaded identification results;
Saved the data to an i2MassChroQ project file using the menu item of the menu in the main program window.